

Contents
今回の目標~
第10回で、ドメインを取得したんで、API Gatewayの機能を追加していきましょう。
カスタムオーソライザーと、カスタムドメインを追加していきます。
やってみたら、カスタムオーソライザーの確認することが多かったので、今回は、カスタムオーソライザーのみを目標にしていきます。
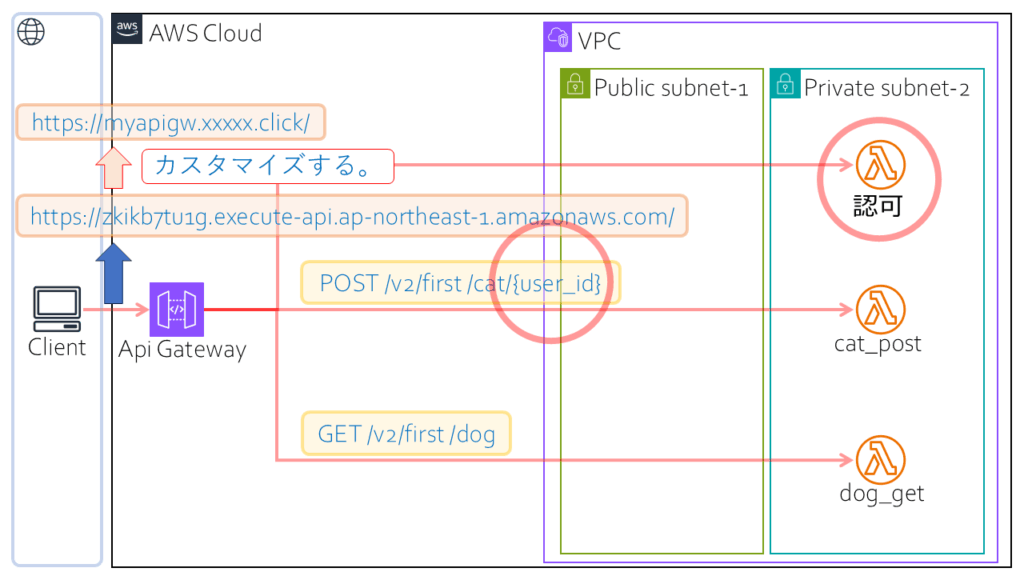
アーキテクト図
アーキテクト図はこんな感じで「認可」が増えて(赤い○)、アクセスするURLが分かりやすい感じなる予定です(こちらは次の回で実施予定)。
あと、追加で、URLのパスパラメータを使い方を試してみます。(赤い○)
カスタムオーソライザー
こちらは、API利用者が接続しに来た時に認可する仕組みになります。
認可方法はいくつか提供されているのですが、そのうちの、Lambda関数を作って認可するカスタムオーソライザーを利用します。
公式HPは以下になります。
「API Gateway Lambda オーソライザーを使用する」
ConstructはCfnAuthorizerを使います。
設定パラメータは、設定が必要なものだけ解り難い部分もあるので書いておきます。
| パラメータ | 設定値 |
| rest_api_id | 設定するAPI GatewayのIDを指定します。 |
| type | “REQUEST”、”TOKEN”、”COGNITO_USER_POOL”があります。カスタムオーソライザーではAWS的にはREQUESTが推しのようです。 あと、カスタムオーソライザーでは、”COGNITO_USER_POOL”は使わないです。 REQUESTだと、header以外にもURLパラメータとかそういったパラメータを複合的に使えるようです。 |
| authorizer_credentials | API Gatewayに付与する権限(IAMロール)を指定します。 オーソライザーとして実行するLambda関数のを実行する権限を付与します。 |
| authorizer_result_ttl_in_seconds | キャッシュされた承認結果の TTL(秒単位)。0は無効です。defaultが300秒 |
| authorizer_uri | オーソライザーとして実行するLambda関数のURL |
| identity_source | オーソライザーに必要なパラメータを指定します。 指定したパラメータが要求電文にないとエラーになります。 |
実施のパラメータファイルは以下の通りです。全体的なことはGITを参照してください。
authorizers:
  apigw_test_authorizer:
    id: "apigw_test_authorizer"
    name: "apigw_test_authorizer"
    rest_api_id: "{{apigwlambda.apigws.apigw_test.attr_rest_api_id}}"
    type: "REQUEST"
    authorizer_credentials: "{{apigwlambda.roles.apigw_test_authorizer.attr_arn}}"
    authorizer_result_ttl_in_seconds: 300
    authorizer_uri: "arn:aws:apigateway:{{common.region}}:lambda:path/2015-03-31/functions/arn:aws:lambda:{{common.region}}:{{common.account}}:function:{{apigwlambda.functions.apigw_test_fnc_authorizer.function_name}}/invocations"
identity_source: "method.request.header.Authorization"authorizer_credentials(IAMロール)の部分は以下の部分です。
以下を参考に作りました。
「チュートリアル: 2 つの AWS サービス統合と 1 つの Lambda 非プロキシ統合を使用して計算ツールの REST API を作成する」
ただ、ここでは「lambda.amazonaws.com」が書いてない例と、書いてる例があって、これが必要なのか?ちょと不明でした。一応「lambda.amazonaws.com」が書いてある方を使ってますけど、「引き受け可能な IAM ロールを作成する」こっちの説明では書いてないんですよね・・・何なんでしょうかね?
apigw_test_authorizer:
  id: "apigw_test_authorizer_role"
  role_name: "apigw_test_authorizer_role"
  description: "apigw lambda authorizer role"
  assume_role_policy_document:
     "Version": "2012-10-17"
     "Statement":
       - "Effect": "Allow"
         "Action": "sts:AssumeRole"
         "Principal":
           "Service":
             - "lambda.amazonaws.com"
             - "apigateway.amazonaws.com"
  #managed_policy_arns:なし
  policies:
    - policy_name: "apigw_test_authorizer_policy"
      policy_document:
        "Version": "2012-10-17"
        "Statement":
          - "Effect": "Allow"
            "Action": "lambda:InvokeFunction"
            "Resource": "{{apigwlambda.functions.apigw_test_fnc_authorizer.attr_arn}}"
オーソライザー関数
オーソライザーの関数は以下の感じです。
こちらは、「API Gateway Lambda オーソライザーを使用する」の「REQUEST オーソライザー Lambda 関数の例」を参考に少し自分のやりたい事に修正していますね。
HTTPヘッダーから認可用のキーを取得して、認可キーがあっているか確認して、認可の場合は、Allowを拒否の場合は、Denyを設定したIAMロールを作って返却するという感じです。
06~12行でeventデータからHTTPリクエストのヘッダー部のAuthorizationから認可に利用するキーを取得します。”bearer testtest”の形式でキーを設定する予定です。testtestが認可キーですね。
14行目でif bearer_key == “testtest”:で確認しています。
一致していたら、レスポンスとしてIAMロールを編集して返却します。
認可の場合はAllowで、拒否するときはDenyを返却します。
Allowは17~26行目、Denyは36~45行目です。
23、42行目のResourceのところは、何も考えず「event[‘methodArn’]」を固定で指定したら良いみたいです。
16、35行目のprincipalIdは・・・良くわかんないんですけど・・・固定値で好きな値を指定しました。(後日何かわかれば更新します。)
さて最後に、27、46行目のcontextについて説明します。
認可のプロセスで何かを後続のAPIで呼ばれるLambda関数に渡すときにパラメータを設定するものです。後続のLambda関数にパラメータがどんな感じで渡されるかを調べるために設定しています。上記の参考した公式HPのソースもこんな感じですね。
01:import json
02:def handler(event, context):
03:    print("[START]authorizer")
04:    print(f"event:{event}")
05:    print(f"context:{context}")
06:    headers = event.get("headers","")
07:    bearer_data = headers.get("Authorization","")
08:    bearer_list=bearer_data.split()
09:    bearer=bearer_list[0]
10:    bearer_key=bearer_list[1]
11:    print(f"bearer_data:{bearer_data}")
12:    print(f"bearer:{bearer} bearer_key:{bearer_key}")
13:    response={}
14:    if bearer_key == "testtest":
15:        response={
16:            'principalId': 'abc1234',
17:            'policyDocument':{
18:                'Version': '2012-10-17',
19:                'Statement': [
20:                    {
21:                        'Action': 'execute-api:Invoke',
22:                        'Effect': 'Allow',
23:                        'Resource': event['methodArn']
24:                    }
25:                ]
26:            },
27:            'context':{
28:                'stringKey': 'catdog',
29:                'numberKey': 123,
30:                'booleanKey': True
31:            }
32:        }
33:    else:
34:        response={
35:            'principalId': 'cdf1234',
36:            'policyDocument':{
37:                'Version': '2012-10-17',
38:                'Statement': [
39:                    {
40:                        'Action': 'execute-api:Invoke',
41:                        'Effect': 'Deny',
42:                        'Resource': event['methodArn']
43:                    }
44:                ]
45:            },
46:            'context':{
47:                'stringKey': 'nonnon',
48:                'numberKey': 567,
49:                'booleanKey': False
50:            }
51:        }
52:    return response
Lambda関数のIAMロール
Lambda関数のIAMロールは、特別な所がないですが、Privateなサブネットで動かすので、
AWSLambdaVPCAccessExecutionRoleを付けるところですかね。
apigw_test_authorizer_fnc:
  id: "apigw_test_authorizer_fnc_role"
  role_name: "apigw_test_authorizer_fnc_role"
  description: "apigw lambda authorizer function role"
  assume_role_policy_document:
     "Version": "2012-10-17"
     "Statement":
       - "Effect": "Allow"
         "Action": "sts:AssumeRole"
         "Principal":
           "Service": "lambda.amazonaws.com"
  managed_policy_arns:
    - "arn:aws:iam::aws:policy/service-role/AWSLambdaBasicExecutionRole"
    - "arn:aws:iam::aws:policy/service-role/AWSLambdaVPCAccessExecutionRole"
  #policies: なし
リソース(APIのパス)
今回URIのパスパラメータを試します。
POST /v2/first/cat/{user_id}
この部分ですね。
このuser_idは設定されるときもあるし、されないときもあるというユースケースです。
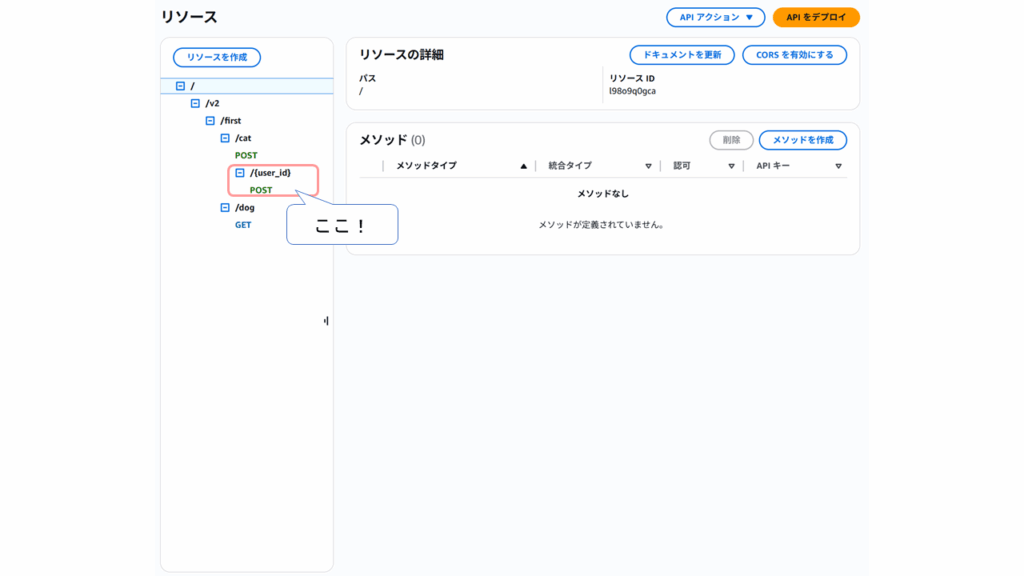
このような場合だとリソースの設定は以下のようになります。
/v2
  /first
    /cat
      POST
      /{user_id}
        POST
「POST」の部分がMethodと紐づける部分でCfnMethodのConstructでリソースを作ってあげないといけな部分になります。
ここは同じLambda関数を紐づければよいのですが、以下のようになります。
/v2
  /first
    /cat
      POST-->CfnMethod(api_test_method_cat)-->Lambda(apigw_test_fnc_cat)
      /{user_id}
POST-->CfnMethod(api_test_method_user_id)-->Lambda(apigw_test_fnc_cat)赤字の部分が今回追加になります。
パラメータの設定は以下の部分になります。
親は「cat」で、パスは「{user_id}」でCfnResourceのリソースを作るですね。
api_test_rsc_user_id:
  id: "api_test_rsc_user_id"
  rest_api_id: "{{apigwlambda.apigws.apigw_test.attr_rest_api_id}}"
  parent_id: "{{apigwlambda.apiresources.api_test_rsc_cat.attr_resource_id}}"
  path_part: "{user_id}"
メソッド(CfnMethod)に渡すパラメータの変更箇所は以下の部分です。
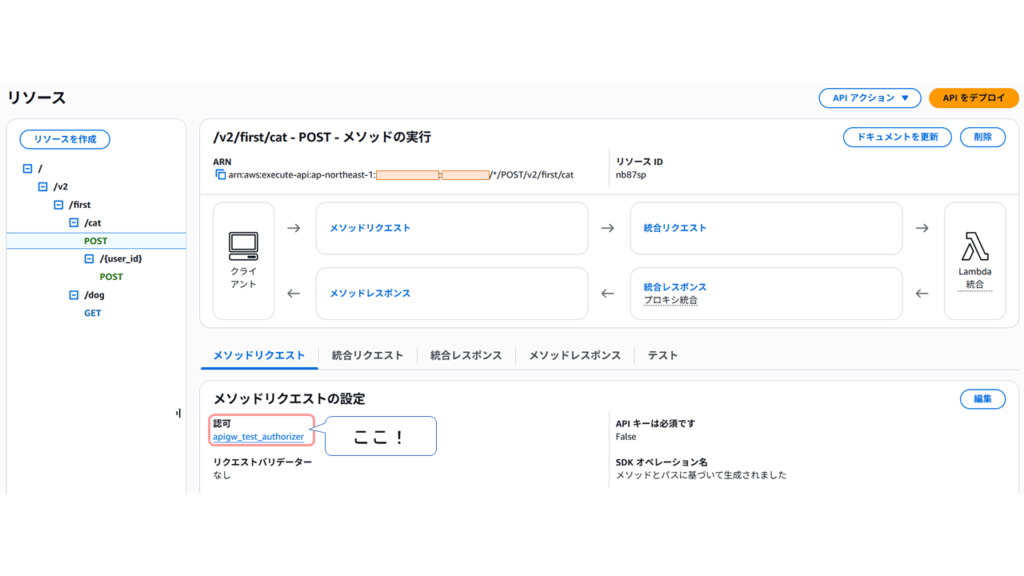
まずは、catですがauthorization_typeがNONE→CUSTOMに変更。これはオーソライザーを有効にするためです。authorizer_idは、CfnAuthorizerで作ったapigw_test_authorizerの物を設定します。
api_test_method_cat:
  id: "api_test_method_cat"
  http_method: "POST"
  rest_api_id: "{{apigwlambda.apigws.apigw_test.attr_rest_api_id}}"
  resource_id: "{{apigwlambda.apiresources.api_test_rsc_cat.attr_resource_id}}"
  authorization_type: "CUSTOM"
  authorizer_id: "{{apigwlambda.authorizers.apigw_test_authorizer.attr_authorizer_id}}"
  integration:
    type: "AWS_PROXY"
    integration_http_method: "POST"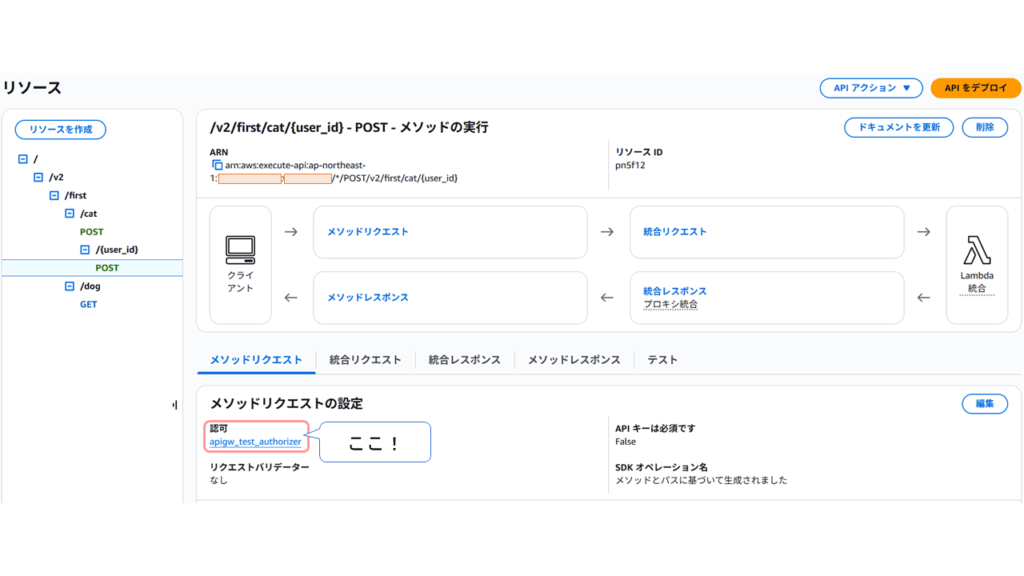
uri: "arn:aws:apigateway:{{common.region}}:lambda:path/2015-03-31/functions/arn:aws:lambda:{{common.region}}:{{common.account}}:function:{{apigwlambda.functions.apigw_test_fnc_cat.function_name}}/invocations"あとuser_id用にもメソッドを作ります。これは「このuser_idは設定されるときもあるし、されないときもある」というユースケースを想定してるからです。
以下は全部追加です。
api_test_method_user_id:
  id: "api_test_method_user_id"
  http_method: "POST"
  rest_api_id: "{{apigwlambda.apigws.apigw_test.attr_rest_api_id}}"
  resource_id: "{{apigwlambda.apiresources.api_test_rsc_user_id.attr_resource_id}}"
  authorization_type: "CUSTOM"
  authorizer_id: "{{apigwlambda.authorizers.apigw_test_authorizer.attr_authorizer_id}}"
  integration:
    type: "AWS_PROXY"
    integration_http_method: "POST"
    uri: "arn:aws:apigateway:{{common.region}}:lambda:path/2015-03-31/functions/arn:aws:lambda:{{common.region}}:{{common.account}}:function:{{apigwlambda.functions.apigw_test_fnc_cat.function_name}}/invocations"
これで変更内容は大体押さえられたかと思えます。
すべてのソースコードは、GITを見て下さい。
デプロイしてかくにーん!ニンニン
さてもうdeployのプロセスは散々やってきたし良いかなと。今回はあんまりエラーでなかったですね。
ただ、ひとつだけ言っておいた方が良いことがあります。
AWSアカウント毎に一度実施しなきゃいけない以下の部分ですが・・・
CfnAccount
accounts:
  apigw_account:
    id: "apigw_account"
    cloud_watch_role_arn: "{{apigwlambda.roles.apigw_account_log.attr_arn}}"
ここで、以下のロググループ「apigw_test_loggrp」を作るのですが、
CfnLogGroup
logs:
  apigw_test_loggrp:
    id: "apigw_test_loggrp"
    log_group_name: "apigw_test_loggrp"
    retention_in_days: 1
    tags:
      - key: "system"
        value: "apigw_test"
このロググループは、destroyしても消えないので、今回のdeployすると残っているために、deployが失敗します。
"Resource of type 'AWS::Logs::LogGroup' with identifier '{"/properties/LogGroupName":"apigw_test_loggrp"}' already exists."のエラーが出てしまいます。ので、これをAWSコンソールから手動で消してからdeployしています。なんか対応策が分かったら更新しますけど・・・今のところ思い付かないですね・・・
ということでデプロイ後のAWSコンソールからのリソース確認です。
まずは、API Gateway→API→apigw_test
次はcatのPOST、オーソライザーが設定されいますね。
次は{user_id}のPOST、オーソライザーが設定されいますね。
「apigw_test_authorizer」をクリックしてオーソライザーの確認
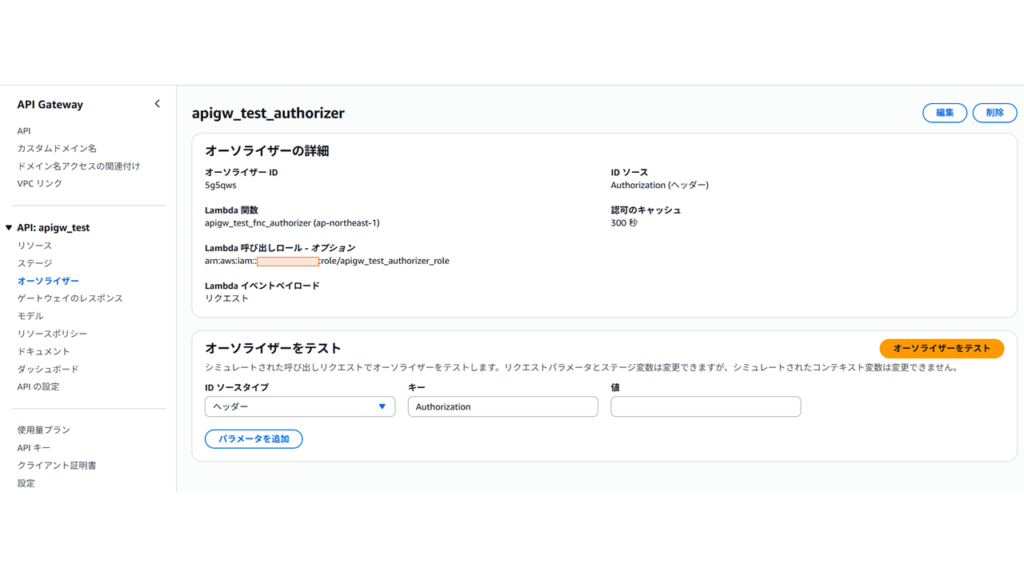
これで大体確認は終わりです。
次から、動作確認をしていきましょう。
動作確認
オーソライザーLambda関数の動作確認
まずは、オーソライザーLambda関数自体の動作確認です。
AWSコンソールからできるようになっているのでやってみましょう。
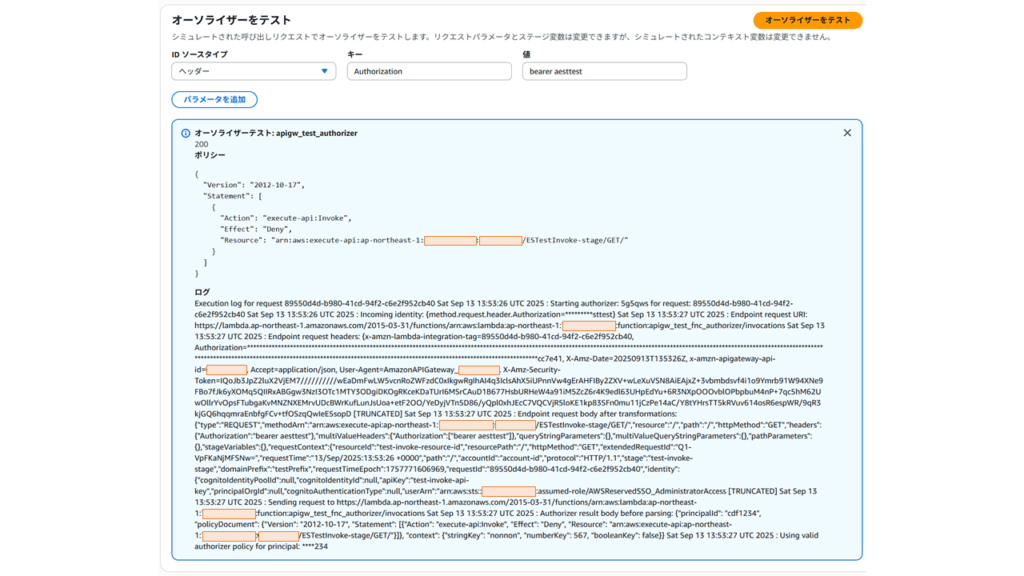
まずはAllowケースの試験です。
API Gateway→オーソライザー→apigw_test_authorizerと進みます。
「オーソライザーをテスト」のところで「値」に「bearer testtest」を入力して、「オーソライザーをテスト」をクリックです。
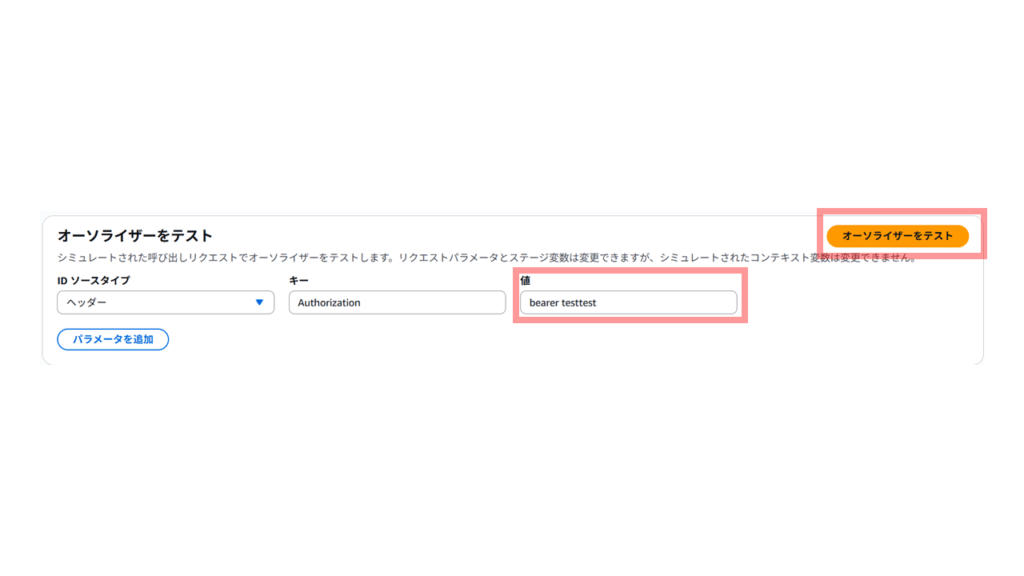
画面では応答で返却されたIAMロールが表示されます。以下の内容です。
{
  "Version": "2012-10-17",
  "Statement": [
    {
      "Action": "execute-api:Invoke",
      "Effect": "Allow",
      "Resource": "arn:aws:execute-api:ap-northeast-1:123456789099:**********/ESTestInvoke-stage/GET/"
    }
  ]
}
続いて、Denyケースの試験です。
「オーソライザーをテスト」のところで「値」に「bearer aesttest」を入力して、「オーソライザーをテスト」をクリックです。
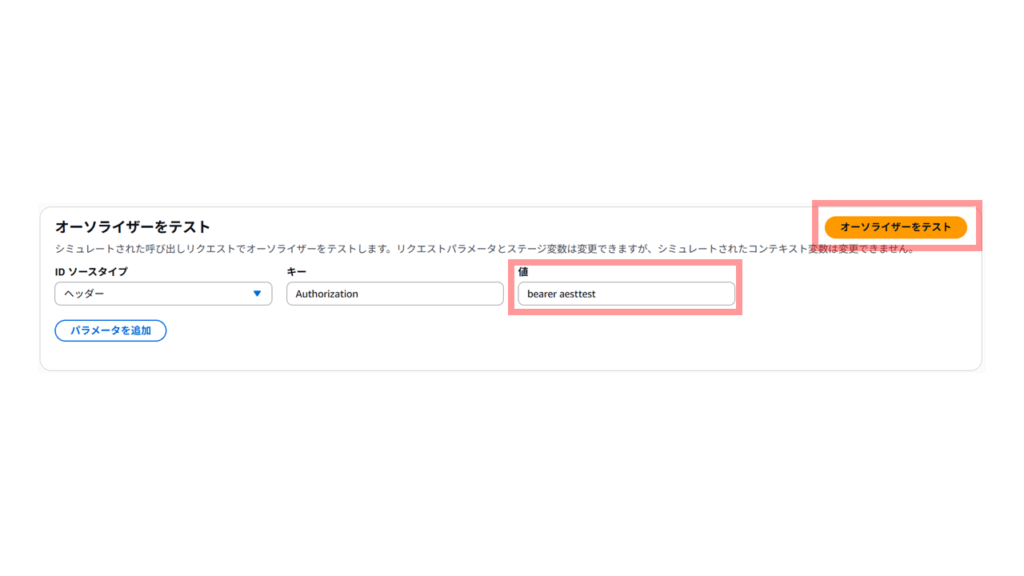
応答で返却されたIAMロールが表示されます。以下の内容です。
{
  "Version": "2012-10-17",
  "Statement": [
    {
      "Action": "execute-api:Invoke",
      "Effect": "Deny",
      "Resource": "arn:aws:execute-api:ap-northeast-1:123456789099:**********/ESTestInvoke-stage/GET/"
    }
  ]
}
外部からのアクセス動作確認
curlを使って動作確認します。まずAllowパターン
curl.exe -v POST 'https://**********.execute-api.ap-northeast-1.amazonaws.com/test/v2/first/cat/1020' -H 'content-type: application/json' -H 'Authorization: bearer testtest' -d '{ \"greeter\": \"John\" }'以下のリプライが返ってきます。
青字はリクエスト、緑字はレスポンス
* Could not resolve host: POST
* shutting down connection #0
curl: (6) Could not resolve host: POST
* Host **********.execute-api.ap-northeast-1.amazonaws.com:443 was resolved.
* IPv6: (none)
* IPv4: ~ 省略 ~
*   Trying xx.xxx.xxx.xxx:443...
* schannel: disabled automatic use of client certificate
* ALPN: curl offers http/1.1
* ALPN: server accepted http/1.1
* Connected to **********.execute-api.ap-northeast-1.amazonaws.com (xx.xxx.xxx.xxx) port 443
* using HTTP/1.x
> POST /test/v2/first/cat/1020 HTTP/1.1
> Host: **********.execute-api.ap-northeast-1.amazonaws.com
> User-Agent: curl/8.14.1
> Accept: */*
> content-type: application/json
> Authorization: bearer testtest
> Content-Length: 21
>
* upload completely sent off: 21 bytes
* schannel: remote party requests renegotiation
* schannel: renegotiating SSL/TLS connection
* schannel: SSL/TLS connection renegotiated
< HTTP/1.1 200 OK
< Date: Sat, 13 Sep 2025 15:05:20 GMT
< Content-Type: */*
< Content-Length: 3
< Connection: keep-alive
< x-amzn-RequestId: e9c75fee-d4ba-4bf5-8cb4-d71e3c1c3e1e
< x-amz-apigw-id: Q2I3hEKUtjMEJKA=
< X-Amzn-Trace-Id: Root=1-68c5882f-5607ff84126aff8413557c44;Parent=6889d6d11745a6f1;Sampled=0;Lineage=2:7b6fca1c:0
<
cat* Connection #1 to host **********.execute-api.ap-northeast-1.amazonaws.com left intact
ここで確認しておきたいのは、
・オーソライザー関数が受信するeventの内容
・オーソライザー関数がcontextに設定した内容を後のLambda関数に渡すときのevent内容です。
まず。Client→オーソライザー関数(apigw_test_authorizer)が受けるeventです。
解りやすいようにインデントと改行を入れています。全部張り付けておきます。
{'type': 'REQUEST',
 'methodArn': 'arn:aws:execute-api:ap-northeast-1:123456789099:**********/test/POST/v2/first/cat/1020',
 'resource': '/v2/first/cat/{user_id}',
 'path': '/v2/first/cat/1020',
 'httpMethod': 'POST',
 'headers': {
   'Accept': '*/*',
   'Authorization': 'bearer testtest',
   'Content-Length': '21',
   'content-type': 'application/json',
   'Host': '**********.execute-api.ap-northeast-1.amazonaws.com',
   'User-Agent': 'curl/8.14.1',
   'X-Amzn-Trace-Id': 'Root=1-68c5882f-5607ff84126aff8413557c44',
   'X-Forwarded-For': 'xxx.xxx.xx.xx',
   'X-Forwarded-Port': '443',
   'X-Forwarded-Proto': 'https'
 },
 'multiValueHeaders': {
   'Accept': ['*/*'],
   'Authorization': ['bearer testtest'],
   'Content-Length': ['21'],
   'content-type': ['application/json'],
   'Host': ['**********.execute-api.ap-northeast-1.amazonaws.com'],
   'User-Agent': ['curl/8.14.1'],
   'X-Amzn-Trace-Id': ['Root=1-68c5882f-5607ff84126aff8413557c44'],
   'X-Forwarded-For': ['xxx.xxx.xx.xx'],
   'X-Forwarded-Port': ['443'],
   'X-Forwarded-Proto': ['https']
 },
 'queryStringParameters': {},
 'multiValueQueryStringParameters': {},
 'pathParameters': {'user_id': '1020'},
 'stageVariables': {},
 'requestContext': {
   'resourceId': 'pn5f12',
   'resourcePath': '/v2/first/cat/{user_id
 }',
 'httpMethod': 'POST',
 'extendedRequestId': 'Q2I3hEKUtjMEJKA=',
 'requestTime': '13/Sep/2025:15:05:19 +0000',
 'path': '/test/v2/first/cat/1020',
 'accountId': '123456789099',
 'protocol': 'HTTP/1.1',
 'stage': 'test',
 'domainPrefix': '**********',
 'requestTimeEpoch': 1757775919718,
 'requestId': 'e9c75fee-d4ba-4bf5-8cb4-d71e3c1c3e1e',
 'identity': {
   'cognitoIdentityPoolId': None,
   'accountId': None,
   'cognitoIdentityId': None,
   'caller': None,
   'sourceIp': 'xxx.xxx.xx.xx',
   'principalOrgId': None,
   'accessKey': None,
   'cognitoAuthenticationType': None,
   'cognitoAuthenticationProvider': None,
   'userArn': None,
   'userAgent': 'curl/8.14.1',
   'user': None
 },
 'domainName': '**********.execute-api.ap-northeast-1.amazonaws.com',
 'deploymentId': '5zlpm4',
 'apiId': '**********'
}Client→オーソライザー関数(apigw_test_authorizer)→cat関数(apigw_test_fnc_cat)が受けるeventです。
{'resource': '/v2/first/cat/{user_id}',
 'path': '/v2/first/cat/1020',
 'httpMethod': 'POST',
 'headers': {
   'Accept': '*/*', 'Authorization': 'bearer testtest',
   'content-type': 'application/json',
   'Host': '**********.execute-api.ap-northeast-1.amazonaws.com',
   'User-Agent': 'curl/8.14.1',
   'X-Amzn-Trace-Id': 'Root=1-68c5882f-5607ff84126aff8413557c44',
   'X-Forwarded-For': 'xxx.xxx.xx.xx',
   'X-Forwarded-Port': '443',
   'X-Forwarded-Proto': 'https'
 },
 'multiValueHeaders': {
   'Accept': ['*/*'],
   'Authorization': ['bearer testtest'],
   'content-type': ['application/json'],
   'Host': ['**********.execute-api.ap-northeast-1.amazonaws.com'],
   'User-Agent': ['curl/8.14.1'],
   'X-Amzn-Trace-Id': ['Root=1-68c5882f-5607ff84126aff8413557c44'],
   'X-Forwarded-For': ['xxx.xxx.xx.xx'],
   'X-Forwarded-Port': ['443'],
   'X-Forwarded-Proto': ['https']
 },
 'queryStringParameters': None,
 'multiValueQueryStringParameters': None,
 'pathParameters': {'user_id': '1020'},
 'stageVariables': None,
 'requestContext': {
   'resourceId': 'pn5f12',
   'authorizer': {
     'numberKey': '123',
     'booleanKey': 'true',
     'stringKey': 'catdog',
     'principalId': 'abc1234',
     'integrationLatency': 360
   },
   'resourcePath': '/v2/first/cat/{user_id}',
   'httpMethod': 'POST',
   'extendedRequestId': 'Q2I3hEKUtjMEJKA=',
   'requestTime': '13/Sep/2025:15:05:19 +0000',
   'path': '/test/v2/first/cat/1020',
   'accountId': '123456789099',
   'protocol': 'HTTP/1.1',
   'stage': 'test',
   'domainPrefix': '**********',
   'requestTimeEpoch': 1757775919718,
   'requestId': 'e9c75fee-d4ba-4bf5-8cb4-d71e3c1c3e1e',
   'identity': {
     'cognitoIdentityPoolId': None,
     'accountId': None,
     'cognitoIdentityId': None,
     'caller': None,
     'sourceIp': 'xxx.xxx.xx.xx',
     'principalOrgId': None,
     'accessKey': None,
     'cognitoAuthenticationType': None,
     'cognitoAuthenticationProvider': None,
     'userArn': None,
     'userAgent': 'curl/8.14.1',
     'user': None
   },
   'domainName': '**********.execute-api.ap-northeast-1.amazonaws.com',
   'deploymentId': '5zlpm4',
   'apiId': '**********'
 },
 'body': '{ ""greeter"": ""John"" }',
 'isBase64Encoded': False
}少し前に戻って、オーソライザー関数(apigw_test_authorizer)では、以下のように設定しています。
15:        response={
16:            'principalId': 'abc1234',
17:            'policyDocument':{
18:                'Version': '2012-10-17',
19:                'Statement': [
20:                    {
21:                        'Action': 'execute-api:Invoke',
22:                        'Effect': 'Allow',
23:                        'Resource': event['methodArn']
24:                    }
25:                ]
26:            },
27:            'context':{
28:                'stringKey': 'catdog',
29:                'numberKey': 123,
30:                'booleanKey': True
31:            }
32: }これが、cat関数(apigw_test_fnc_cat)では以下のように渡されています。
requestContext下のauthorizerに設定されるってことですね。
 'requestContext': {
   'resourceId': 'pn5f12',
   'authorizer': {
     'numberKey': '123',
     'booleanKey': 'true',
     'stringKey': 'catdog',
     'principalId': 'abc1234',
     'integrationLatency': 360
   },
Denyパターン
curl.exe -v POST 'https://**********.execute-api.ap-northeast-1.amazonaws.com/test/v2/first/cat/1020' -H 'content-type: application/json' -H 'Authorization: bearer aesttest' -d '{ \"greeter\": \"John\" }'以下のリプライが返ってきます。
青字はリクエスト、緑字はレスポンス
レスポンスコードは「HTTP/1.1 403 Forbidden」で、レスポンスボディに「”Message”:”User is not authorized to access this resource with an explicit deny”」
認可で拒否られた感じしますね。
* Could not resolve host: POST
* shutting down connection #0
curl: (6) Could not resolve host: POST
* Host **********.execute-api.ap-northeast-1.amazonaws.com:443 was resolved.
* IPv6: (none)
* IPv4: ~ 省略 ~
*   Trying xx.xxx.x.xxx:443...
* schannel: disabled automatic use of client certificate
* ALPN: curl offers http/1.1
* ALPN: server accepted http/1.1
* Connected to **********.execute-api.ap-northeast-1.amazonaws.com (xx.xxx.x.xxx) port 443
* using HTTP/1.x
> POST /test/v2/first/cat/1020 HTTP/1.1
> Host: **********.execute-api.ap-northeast-1.amazonaws.com
> User-Agent: curl/8.14.1
> Accept: */*
> content-type: application/json
> Authorization: bearer aesttest
> Content-Length: 21
>
* upload completely sent off: 21 bytes
* schannel: remote party requests renegotiation
* schannel: renegotiating SSL/TLS connection
* schannel: SSL/TLS connection renegotiated
< HTTP/1.1 403 Forbidden
< Date: Sat, 13 Sep 2025 15:09:54 GMT
< Content-Type: application/json
< Content-Length: 82
< Connection: keep-alive
< x-amzn-RequestId: 615bfa36-016e-4232-a420-e38e20c6d46b
< x-amzn-ErrorType: AccessDeniedException
< x-amz-apigw-id: Q2JiaGLMNjMECUw=
<
{"Message":"User is not authorized to access this resource with an explicit deny"}* Connection #1 to host **********.execute-api.ap-northeast-1.amazonaws.com left intactこれで、今回はおしまいです。全てのソースはGITを見て下さい~。
次回は「いちはじCDK 第12回 API GateWay④」でカスタムドメインを設定してみます~。

コメント