

Contents
それでは!
(´_ゝ`)構築開始だよ~
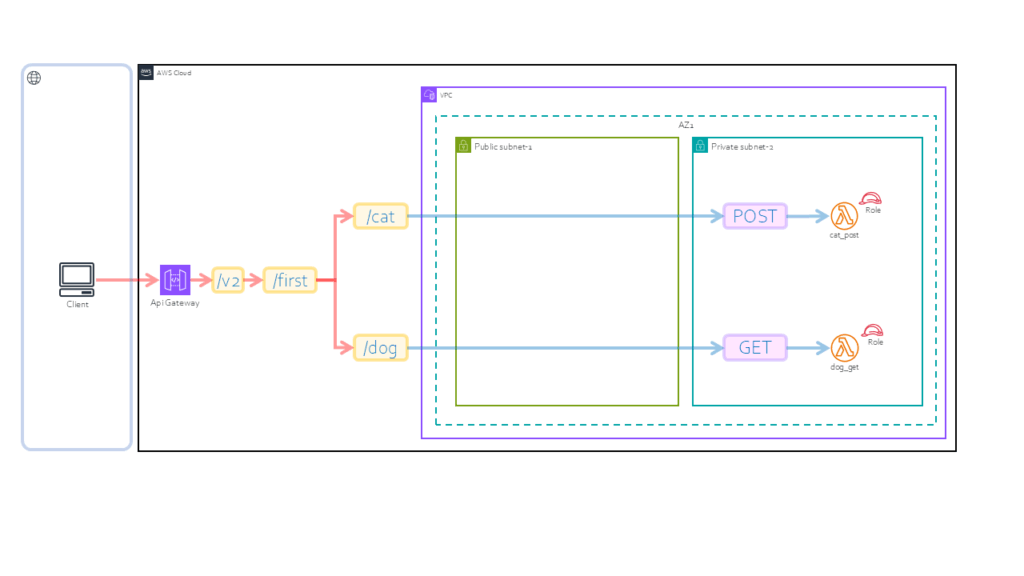
まずはアーキテクト図を再び張って始めましょう~
構築順
構築は以下の順でやっていきます。
①VPCとpublic、privateサブネットを作る。
②API Gateway(CfnRestApi)を作る。
③リソース・メソッド(CfnResource・CfnMethod)を作る。※Lambdaも必要
④デプロイ(CfnDeployment)を作る。
⑤ステージ(CfnStage)を作る。
です!
と・・・その前に
その前にプロジェクトの方の見直しを…
(´・ω・)えっ?また?
まぁ今回色々使ってみるうちにダメな所が見つかりましてね…
あと、今までStackが1つでやってきましたけど、VPCを作ったりするStackと、API Gatewayを構築するStackは、別けた方がいいかなと思いまして…
Stackについては、AWSさん曰く…
「なるべく1つにまとめた方が良い」
ってことみたいですね。確かに、Stack別けると依存関係とかで躓くことがありますね。
ただ、別けるべき時もあるかと思いますね。
VPC/サブネットあたりのネットワーク系は別けた方が良いかと思いますので、Stackを別けるための見直しをしたいと思います。
まずダメな所
Lambda関数のConstructを例に説明します。
まず指定するパラメータと、CfnFunctionのパラメータを比較してみます。
以下のようにyamlパラメータを指定するとそのまま、Constructのパラメータにうまい具合にパラメータが設定される予定でしたが…赤字の部分については、cdk synthしたときにパラメータが上手く設定されませんでした。
yamlパラメータ
functions:
  apigw_test_fnc_cat:
    id: "apigw_test_fnc_cat"
    function_name: "apigw_test_fnc_cat"
    role: "{{apigwlambda.roles.…省略….attr_arn}}"
    runtime: "python3.11"
    code:
      zip_file: |
        import json
        def handler(event, context):
           …省略…
            return res
    handler: "index.handler"
    vpc_config:
      security_group_ids:
        - "{{apigwlambda.…省略….attr_group_id}}"
      subnet_ids:
        - "{{pwork.subnets.…省略….attr_subnet_id}}"
        - "{{pwork.subnets.…省略….attr_subnet_id}}"
    reserved_concurrent_executions: 1
CfnFunction


id:任意の名前
function_name:任意の名前
role:IAMロールのARN
runtime: "python3.11"を指定する。
code:コード内容を記載


handler:ハンドラー関数を指定
vpc_config:配置先のサブネット情報を指定


reserved_concurrent_executions:実行時間を指定
でなんで?!って話なんですけどっ!
codeパラメータを例に説明すると、codeパラメータは以下のように定義されていて、
code (Union[IResolvable, CodeProperty, Dict[str, Any]])Dictに変換して設定しているので上手く行くんじゃないの?って思ってましたけど、これが上手く行かなくて、CodePropertyの形でないと上手く設定できないってものでした。
と言うことでこの手のパターンは以下のようにMyConstructクラスを変更することで対応することにしました。
(・´з`・)悲しいな・・・
それでもコーディングする部分は減っていると思うので…いいかなって思っています。
変更前
# ==============================
# CfnFunction
# ==============================
class MyFunction(MyBase):
    def __init__(self, obj: Any, name: str):
        super().__init__(obj, name)

    def create(self, myif: dict) -> Any:
        return super().create(myif)

    def _rsc_(self, rscif: dict, myif: dict) -> CfnFunction:


        rsc = CfnFunction(**rscif)
        return rsc
変更後
# ==============================
# CfnFunction
# ==============================
class MyFunction(MyBase):
    def __init__(self, obj: Any, name: str):
        super().__init__(obj, name)

    def create(self, myif: dict) -> Any:
        return super().create(myif)

    def _rsc_(self, rscif: dict, myif: dict) -> CfnFunction:
        if "vpc_config" in rscif:
          rscif["vpc_config"] = CfnFunction.VpcConfigProperty(**rscif["vpc_config"])
        if "code" in rscif:
          rscif["code"] = CfnFunction.CodeProperty(**rscif["code"])
        rsc = CfnFunction(**rscif)
        return rsc
特別に型を指定して設定しなければならないものは、まずパラメータとして、KEY設定があるかを確認
if "code" in rscif:あったら、dict型をCodeProperty型に変換して設定し直す。
rscif["code"] = CfnFunction.CodeProperty(**rscif["code"])と言う形に修正しています。
vpc_configのところも同じですね。このような変換が必要なパラメータがある毎にこの作業はしないといけないのはちょっとあれなんですけど…仕方ないかな…
複数スタックに対応
いままで、1つのyamlファイルで、1Stackを表現していましたが、いくつかのStackを指定できるように、yamlファイルの構成を見直しました。
今まで…
first_vpc_params.yaml
---
common:
  region: ap-northeast-1
  account: "123456789099"
  tags :
    system: "firstvpc"

firstvpc:
  vpcs:
…以下省略…
これから…
common.yaml
---
common:
region: ap-northeast-1
account : "123456789099"
tags :
system: "apigwlambda"
pwork_vpc.yaml
---
pwork:
vpcs:
…以下省略…
apigwlambda.yaml
---
apigwlambda:
roles:
まず、「common.yaml」を作って共通のパラメータを設定。あとは「pwork_vpc.yaml」、「apigwlambda.yaml」のようにStack毎にパラメータファイルを別けました。
最後に、stacks.yamlというファイルを作ってstacks.yamlを元に全てのパラメータファイルを読み込むようにします。
---
common: "common.yaml"
stacks:
  - "pwork_vpc.yaml"
  - "apigwlambda.yaml"
この形式でパラメータファイルを読み込むために、以下の関数(configread2)を追加しました。
一応以前の形のパラメータファイルを読み込む関数(configread)も残しました。
def configread2(path: str, filename: str) -> dict:
    tmpconfig: dict = {}

    tmplist: dict = {}
    list_file=path + "/" + filename

    with open(list_file, encoding="utf-8") as file:
        tmplist = yaml.safe_load(file)

    tmpcmn: dict = {}
    common_file=path + "/" + tmplist["common"]

    with open(common_file, encoding="utf-8") as file:
        tmpcmn = yaml.safe_load(file)

    tmpconfig.update(tmpcmn)

    stacks=tmplist["stacks"]
    for onestack in stacks:
        tmpstack: dict = {}
        stack_file=path + "/" + onestack
        with open(stack_file, encoding="utf-8") as file:
            tmpstack = yaml.safe_load(file)
        tmpconfig.update(tmpstack)

    tmpret, config = rep_rice(tmpconfig)

    return config
呼び出し側のapp.pyは以下の感じで修正です。
#!/usr/bin/env python3
import os

from aws_cdk import App, Environment

from core.apigw_lambda_stack import ApigwLambdaStack
from core.myconstructs.myctrl import MyCtrl


from core.utils.configread import configread

app = App()
myctrl = MyCtrl(config=configread("core/parameters/apigwlambda_params.yaml"))
env = Environment(region=myctrl.common.region, account=myctrl.common.account)
ApigwLambdaStack(app, "ApigwLambdaStack", myctrl=myctrl, env=env)
app.synth()
#!/usr/bin/env python3
import os
from aws_cdk import App, Environment
from core.apigw_lambda_stack import ApigwLambdaStack
from core.myconstructs.myctrl import MyCtrl
from core.pwork_vpc_stack import PworkVpcStack
from core.utils.configread import configread2
app = App()
myctrl = MyCtrl(config=configread2("core/parameters","stacks.yaml"))
env = Environment(region=myctrl.common.region, account=myctrl.common.account)
pworkvpcstack=PworkVpcStack(app, "PworkVpcStack", myctrl=myctrl, env=env)
apigwlambdastack=ApigwLambdaStack(app, "ApigwLambdaStack", myctrl=myctrl, env=env)
apigwlambdastack.add_dependency(pworkvpcstack)
app.synth()configread→configread2に変更。
MyCtrl(config=configread2("core/parameters","stacks.yaml"))VPCなどの環境作成用のStackとしてPworkVpcStackを追加
pworkvpcstack=PworkVpcStack(app, "PworkVpcStack", myctrl=myctrl, env=env)Apigwlambdastackに依存関係を追加しています。
apigwlambdastack.add_dependency(pworkvpcstack)と…この辺の修正したところは、GITのプロジェクトの方を見てもらえたら良いかなと…
それでは・・・①VPCとpublic、privateサブネット
前置きが長かったですけど…話を進めます。
まずは、ネットワークから、こちらは、最初につくったfirst_vpcを少し改造して作りました。
first_vpcだと、インターネットGateway作ったんですけど、お金かかるんでそれを外しています。
以下、pwork_vpc.yamlになります。
GITのプロジェクトの方も見てもらえたら良いかなと…
あと、説明することは特にないです…(´_ゝ`)ふーん…
---
pwork:
  vpcs:
    pworkvpc:
      id: "pworkvpc"
      cidr_block: "10.0.0.0/16"
      enable_dns_hostnames: True
      enable_dns_support: True
      instance_tenancy: "default"
      tags:
        - key: "Name"
          value: "pworkvpc"

  subnets:
    pwork_pub_subnet_az1:
      id: "pwork_pub_subnet_az1"
      vpc_id: "{{pwork.vpcs.pworkvpc.vpc_id}}"
      availability_zone: "ap-northeast-1a"
      cidr_block: "10.0.0.0/24"
    pwork_pub_subnet_az3:
      id: "pwork_pub_subnet_az3"
      vpc_id: "{{pwork.vpcs.pworkvpc.vpc_id}}"
      availability_zone: "ap-northeast-1c"
      cidr_block: "10.0.1.0/24"
    pwork_pri_subnet_az1:
      id: "pwork_pri_subnet_az1"
      vpc_id: "{{pwork.vpcs.pworkvpc.vpc_id}}"
      availability_zone: "ap-northeast-1a"
      cidr_block: "10.0.2.0/24"
    pwork_pri_subnet_az3:
      id: "pwork_pri_subnet_az3"
      vpc_id: "{{pwork.vpcs.pworkvpc.vpc_id}}"
      availability_zone: "ap-northeast-1c"
      cidr_block: "10.0.3.0/24"

  route_tables:
    pwork-pub-routetbl:
      id: "pwork-pub-routetbl"
      vpc_id: "{{pwork.vpcs.pworkvpc.vpc_id}}"
      tags:
        - key: "Name"
          value: "pwork-pub-routetbl"
    pwork-pri-routetbl:
      id: "pwork-pri-routetbl"
      vpc_id: "{{pwork.vpcs.pworkvpc.vpc_id}}"
      tags:
        - key: "Name"
          value: "pwork-pri-routetbl"

  subnet-routes:
    pwork_pub_subnet_route_az1:
      id: "pwork_pub_subnet_route_az1"
      route_table_id: "{{pwork.route_tables.pwork-pub-routetbl.attr_route_table_id}}"
      subnet_id: "{{pwork.subnets.pwork_pub_subnet_az1.attr_subnet_id}}"
    pwork_pub_subnet_route_az3:
      id: "pwork_pub_subnet_route_az3"
      route_table_id: "{{pwork.route_tables.pwork-pub-routetbl.attr_route_table_id}}"
      subnet_id: "{{pwork.subnets.pwork_pub_subnet_az3.attr_subnet_id}}"
    pwork_pri_subnet_route_az1:
      id: "pwork_pri_subnet_route_az1"
      route_table_id: "{{pwork.route_tables.pwork-pri-routetbl.attr_route_table_id}}"
      subnet_id: "{{pwork.subnets.pwork_pri_subnet_az1.attr_subnet_id}}"
    pwork_pri_subnet_route_az3:
      id: "pwork_pri_subnet_route_az3"
      route_table_id: "{{pwork.route_tables.pwork-pri-routetbl.attr_route_table_id}}"
      subnet_id: "{{pwork.subnets.pwork_pri_subnet_az3.attr_subnet_id}}"
②API Gateway(CfnRestApi)
API Gatewayはあまり、説明することもなく、設定パラメータも少ないです。
apigwlambda.yamlのAPI Gatewayの部分を抜粋します。
必要最低限しか設定していません。API Gatewayのエンドポイントタイプとかの違いで設定しなければならないパラメータは変わってきます。今回は、endpoint_configurationのところで設定している”REGIONAL”が「リージョン API エンドポイント」を表しています。
apigws:
apigw_test:
id: "apigw_test"
description: "apigateway lambda test"
endpoint_configuration:
types:
- "REGIONAL"
name: "apigw_test"
tags:
- key: "Vertion"
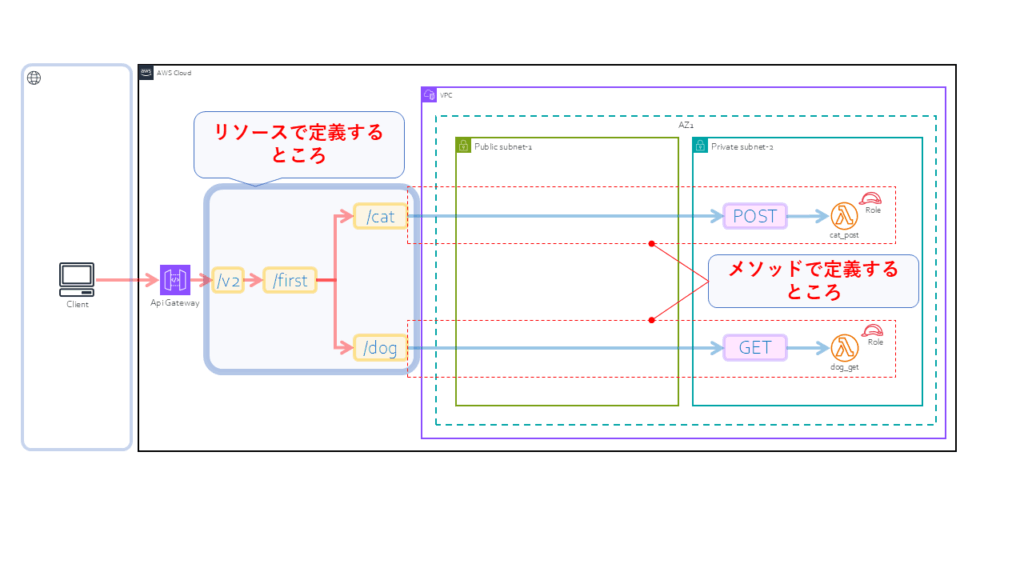
value: "1.0.0"③リソース・メソッド(CfnResource・CfnMethod)
前回も書きましたが、以下の部分の作成です。
リソース(CfnResource)
リソースは、PATHを表現します。
ただ、1階層づつしか表現できなくて、複数階層を表現するときは、親のConstructに関連付けて子のConstructを作って構築していく感じです。
イメージが以下になります。
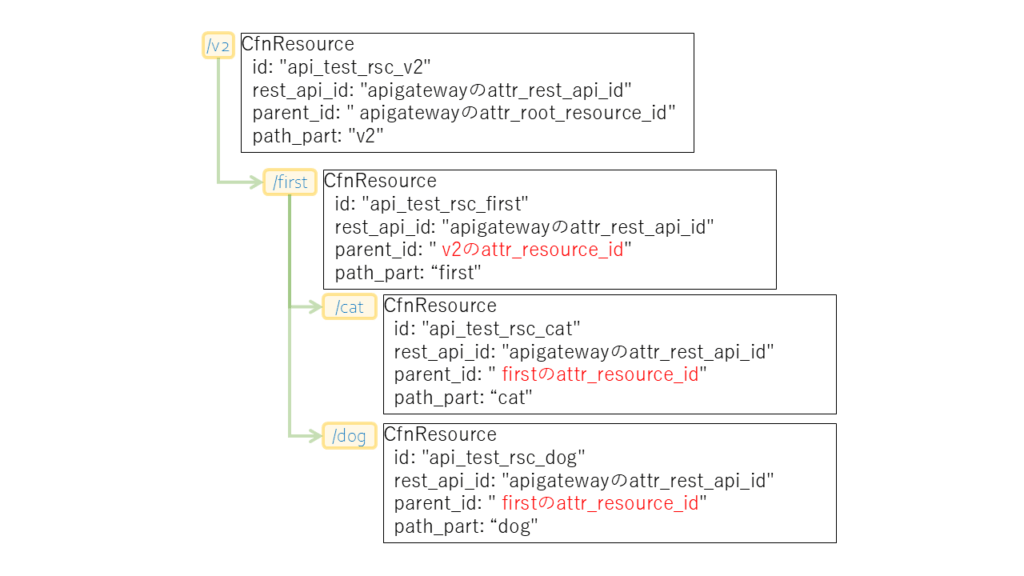
こちらを設定したのが以下のパラメータリストになります。
  apiresources:
    api_test_rsc_v2:
      id: "api_test_rsc_v2"
      rest_api_id: "{{apigwlambda.apigws.apigw_test.attr_rest_api_id}}"
      parent_id: "{{apigwlambda.apigws.apigw_test.attr_root_resource_id}}"
      path_part: "v2"
    api_test_rsc_first:
      id: "api_test_rsc_first"
      rest_api_id: "{{apigwlambda.apigws.apigw_test.attr_rest_api_id}}"
      parent_id: "{{apigwlambda.apiresources.api_test_rsc_v2.attr_resource_id}}"
      path_part: "first"
    api_test_rsc_cat:
      id: "api_test_rsc_cat"
      rest_api_id: "{{apigwlambda.apigws.apigw_test.attr_rest_api_id}}"
      parent_id: "{{apigwlambda.apiresources.api_test_rsc_first.attr_resource_id}}"
      path_part: "cat"
    api_test_rsc_dog:
      id: "api_test_rsc_dog"
      rest_api_id: "{{apigwlambda.apigws.apigw_test.attr_rest_api_id}}"
      parent_id: "{{apigwlambda.apiresources.api_test_rsc_first.attr_resource_id}}"
      path_part: "dog"
リソースについては、こんなところかなと…
メソッド(CfnMethod)
次はメソッドです。メソッドはPOST、GET等のHTTPメソッドと、PATHの関係を定義します。それと動作させるLambda関数とも関連付けます。
今回はLambda関数については、細かく説明しないです。あるものだと思ってください。
まず/v2/first/catの方のメソッドですが、パラメータは以下になります。
  apimethods:
    api_test_method_cat:
      id: "api_test_method_cat"
      http_method: "POST"
      rest_api_id: "{{apigwlambda.apigws.apigw_test.attr_rest_api_id}}"
      resource_id: "{{apigwlambda.apiresources.api_test_rsc_cat.attr_resource_id}}"
      authorization_type: "NONE"
      integration:
        type: "AWS_PROXY"
        integration_http_method: "POST"
        uri: "arn:aws:apigateway:{{common.region}}:lambda:path/2015-03-31/functions/arn:aws:lambda:{{common.region}}:{{common.account}}:function:{{apigwlambda.functions.apigw_test_fnc_cat.function_name}}/invocations"
上記、赤字のところがポイントになります。
http_methodは、紐づけるべきHTTPのメソッドです。構成図の通り、ここはPOSTを指定しています。
rest_api_idは、API Gatewayのattr_rest_api_id
resource_idは、「/v2/first/cat」のattr_resource_id
integrationの下のtypeは、「Lambdaプロキシ統合」の場合、”AWS_PROXY”を指定です。
同じくintegrationの下のintegration_http_methodは、「Lambdaプロキシ統合」の場合、必ず”POST”を指定しないとダメです。
最後にuriです。これがちょっと戸惑いましたね。でもこの形であっているそうです。
以下赤字以外のところは書いてある通りの固定値になります。一番理解に苦しんだのは「2015-03-31」でこれであっているの?って疑ったんですけど、色々調べてみるとこれが正解のようです。
arn:aws:apigateway:リージョンID:lambda:path/2015-03-31/functions/arn:aws:lambda:リージョンID:アカウントID:function:Lambda関数の名前/invocations
と言うことで、/v2/first/dogの方は、省略します。GITのプロジェクトの方も見てもらえたら良いかなと…
④デプロイ(CfnDeployment)
デプロイはあまり書くことなし…パラメータ抜粋のみ記載します。
  apideployments:
    api_test_deployment:
      id: "api_test_deployment"
      rest_api_id: "{{apigwlambda.apigws.apigw_test.attr_rest_api_id}}"
      description: "api test stage"
⑤ステージ(CfnStage)
ステージについてもあまり書くことないですね。
ただ、access_log_settingのところは少々説明が必要かなと…
  apistages:
    api_test_stage:
      id: "api_test_stage"
      rest_api_id: "{{apigwlambda.apigws.apigw_test.attr_rest_api_id}}"
      access_log_setting:
        destination_arn: "{{apigwlambda.logs.apigw_test_loggrp.attr_arn}}"
      description: "api test stage"
      deployment_id: "{{apigwlambda.apideployments.api_test_deployment.attr_deployment_id}}"
      stage_name: "test"
      tags:
        - key: "Vertion"
          value: "1.0.0"
access_log_settingを設定するためには、AWSコンソールでいうところの以下を設定しないといけないです。
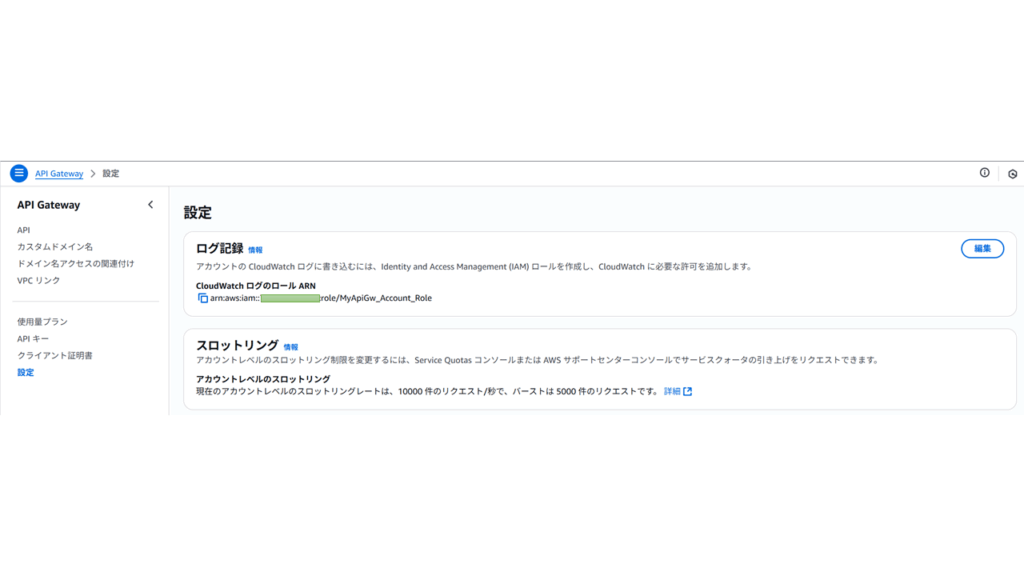
これはアカウント共通なので、アカウントで1回しなといけない作業になります。
この件について、以下のサイトで説明してくれています。
Amazon API Gateway のログを Amazon CloudWatch Logs に書き込むための IAM ロールはアカウント単位の設定です
やらないといけない事は、API Gatewayに以下のログをプッシュする権限を付ける
AmazonAPIGatewayPushToCloudWatchLogs
アカウントの共通設定で、上記の権限を設定して有効にするです。
これらの設定を、AWSコンソールから直接設定でもよいですが、CDKで設定しています。
使うConstructは、「CfnRole」(権限作って)、「CfnAccount」(API Gatewayの設定に権限設定)です。
パラメータは以下の通りです。まずは、CfnRole
  roles:
    apigw_account_log:
      id: "apigw_account_log"
      role_name: "MyApiGw_Account_Role"
      description: "My ApiGw Account Role"
      assume_role_policy_document:
         "Version": "2012-10-17"
         "Statement":
           - "Effect": "Allow"
             "Action": "sts:AssumeRole"
             "Principal":
               "Service": "apigateway.amazonaws.com"
      managed_policy_arns:
        - "arn:aws:iam::aws:policy/service-role/AmazonAPIGatewayPushToCloudWatchLogs"
次にCfnAccount
  accounts:
    apigw_account:
      id: "apigw_account"
      cloud_watch_role_arn: "{{apigwlambda.roles.apigw_account_log.attr_arn}}"
デっぷろい~
さて大体説明したので、deployして動作確認します。
今回Stackを2つ作っているので、まず、
cdk lsでStackを確認します。以下の感じでStackが2つ出てくるので、
PworkVpcStack
ApigwLambdaStack
まずは、ネットワーク系のStackを作って行きます。
> cdk synth PworkVpcStackで内容を確認して
> cdk diff PworkVpcStackdiffを取得して変更内容を確認
> cdk deploy PworkVpcStackでデプロイ実施です。
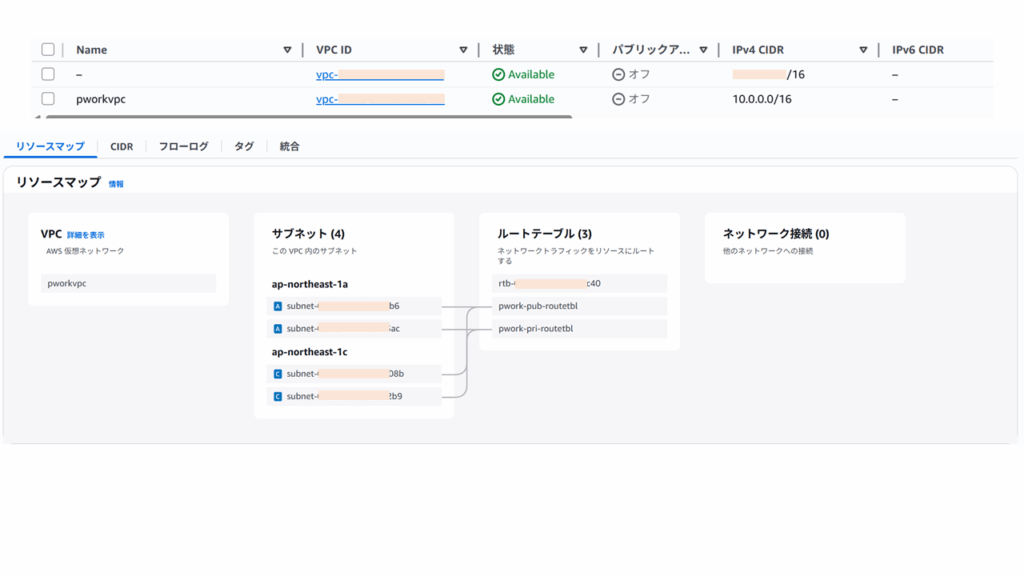
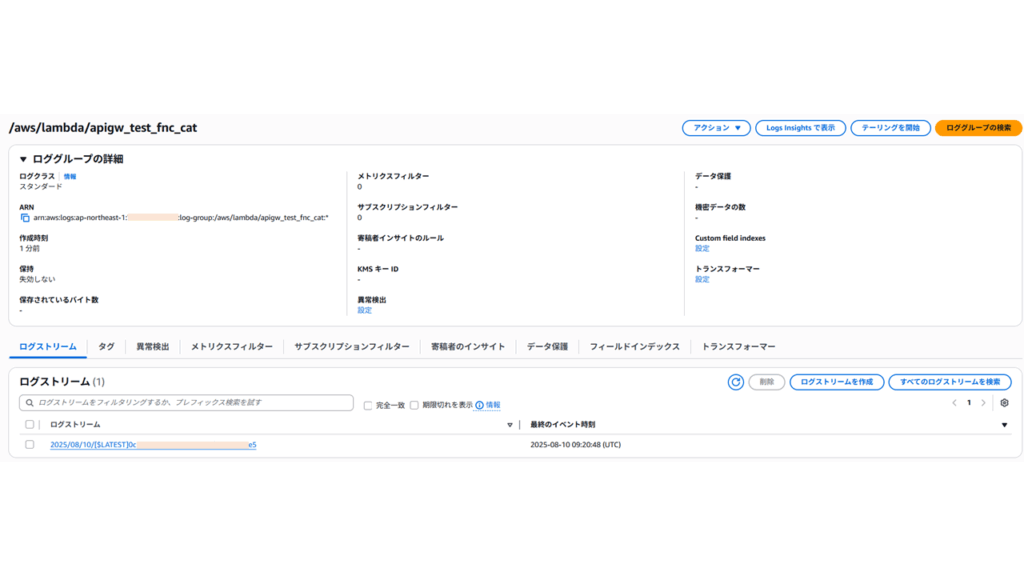
デプロイ実施後はAWSコンソールから確認すると以下の感じになるかと思います。
続いてAPI Gatewayのデプロイです。同じように
> cdk synth ApigwLambdaStackで内容の確認
> cdk diff ApigwLambdaStackで差分確認して
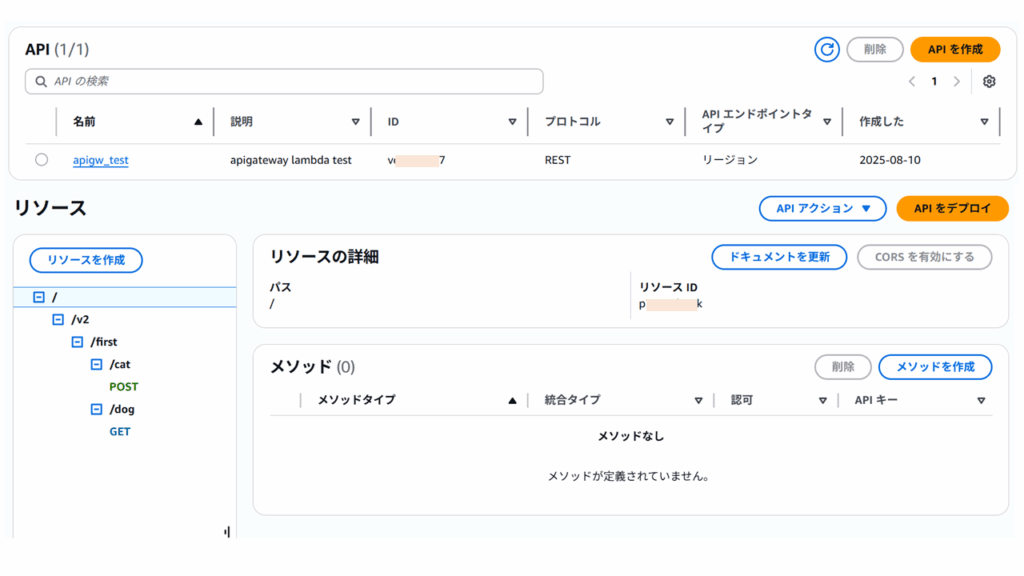
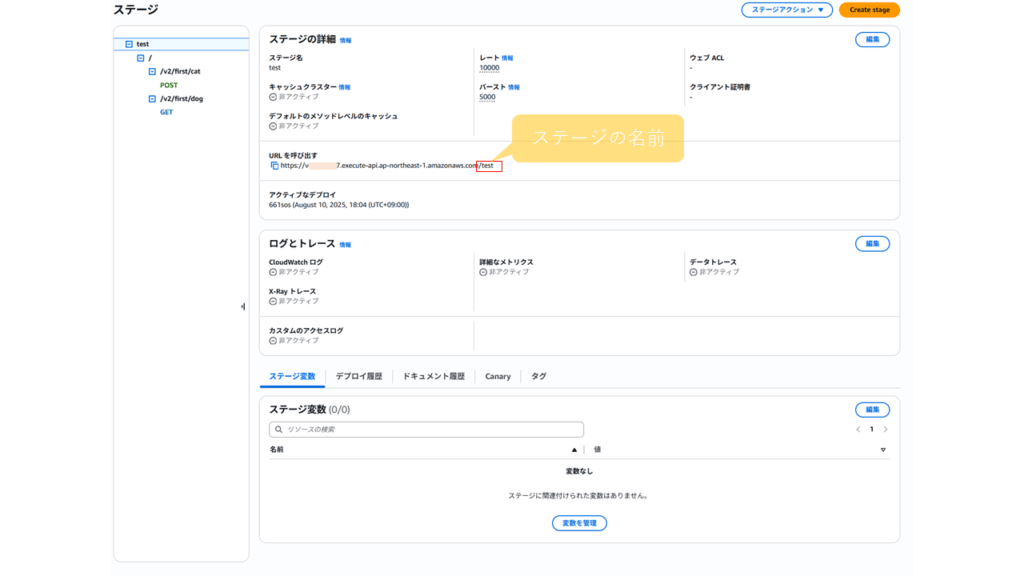
> cdk deploy ApigwLambdaStackでデプロイです。そうすると、AWSコンソールから確認すると以下のイメージなると思います。
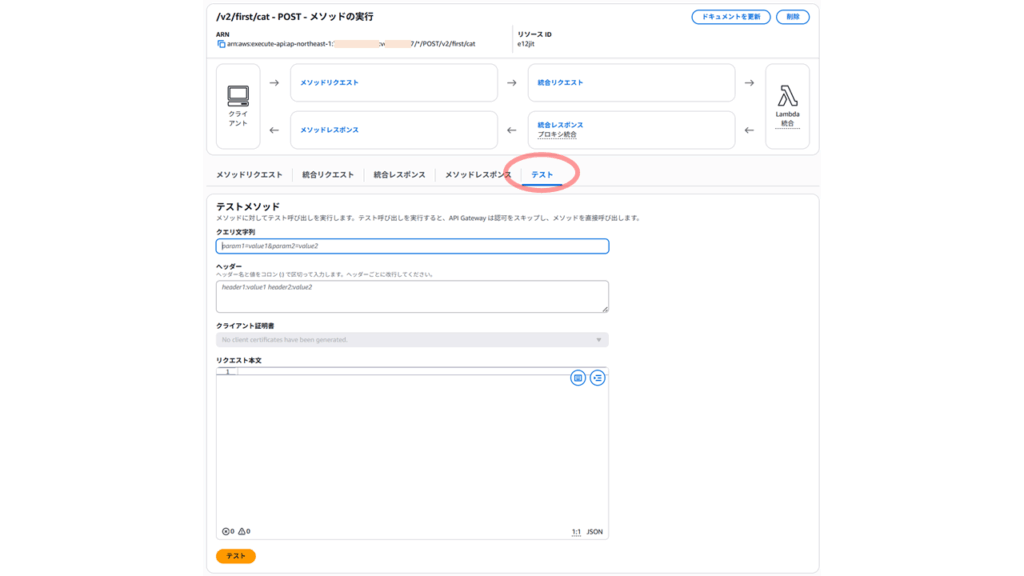
/v2/first/catのPOSTを選択すると、以下のイメージです。

これでデプロイ完了です。
動作確認:AWSコンソールから
動作確認は、まずAWSコンソールからのテストを実施して上手く行けば、自分のPCなどAWSの外部からアクセス確認していくという手順が良いかと思います。
テスト手順なんかは以下の公式サイト見ると良いと思います。
公式サイト:チュートリアル: Lambda プロキシ統合を使用して REST API を作成する
最初はAWSコンソールからのテストです。
/v2/first/cat-POSTのテストタブをクリックです。
クエリ文字列とヘッダーとリクエスト本文(JSON)があるので、この辺を設定しておきます。
内容は適当で良いかと…
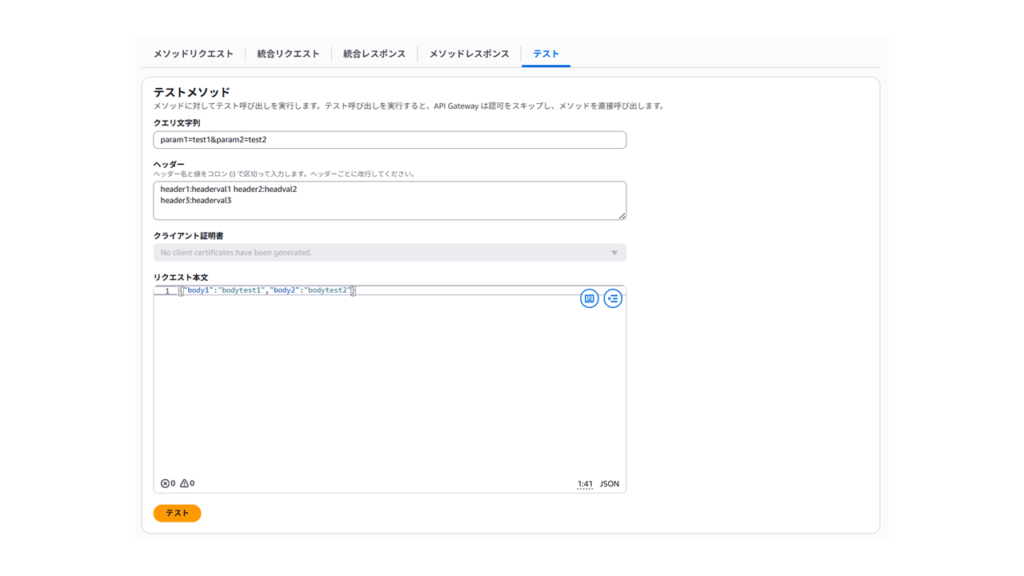
で、パラメータ設定したら、「テスト」ボタンをクリック。
上手く行くと以下のイメージで結果が出てきます。
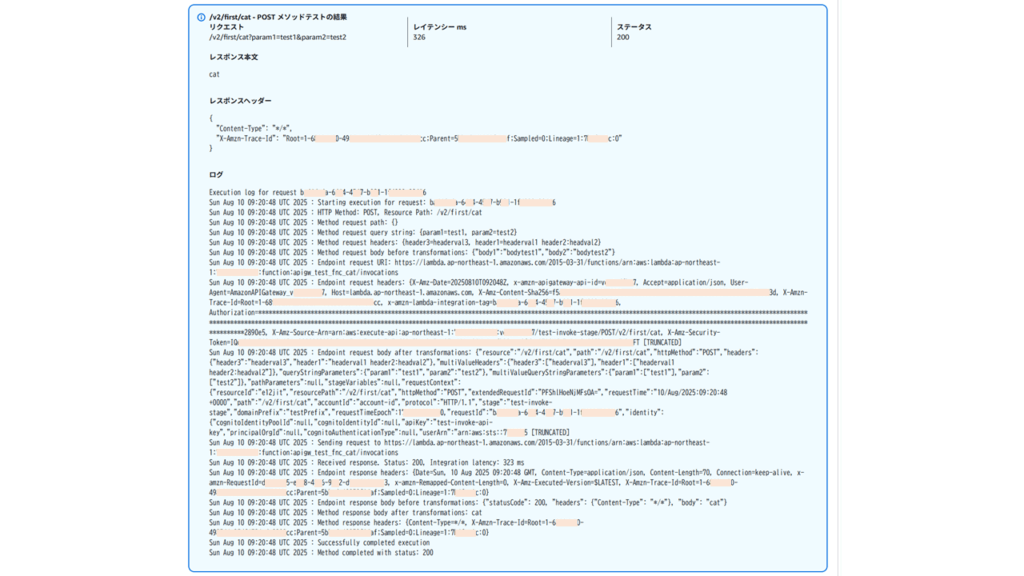
ここで、結果がCloudWatchへ出力されているかを確認します。
さて、Lambda関数はeventパラメータで、Clientからのリクエストの内容を受け取ります。
なので、ここに何が入ってくるのかを見ておきたいと思います。
テスト実施時に以下のパラメータを設定しました。
クエリ文字列:param1=test1¶m2=test2
ヘッダー:header1:headerval1 header2:headerval2
header3:headerval3
リクエスト本文:{“body1″:”bodytest1″,”body2″:”bodytest2”}
これがeventパラメータにどんな感じで設定されるかを見てみます。
赤字の部分が該当します。開発の時には参考になるかと思います。
{
    "resource": "/v2/first/cat",
    "path": "/v2/first/cat",
    "httpMethod": "POST",
    "headers": {
        "header3": "headerval3",
        "header1": "headerval1 header2:headval2"
    },
    "multiValueHeaders": {
        "header3": [
            "headerval3"
        ],
        "header1": [
            "headerval1 header2:headval2"
        ]
    },
    "queryStringParameters": {
        "param1": "test1",
        "param2": "test2"
    },
    "multiValueQueryStringParameters": {
        "param1": [
            "test1"
        ],
        "param2": [
            "test2"
        ]
    },
    "pathParameters": None,
    "stageVariables": None,
    "requestContext": {
        "resourceId": "e####t",
        "resourcePath": "/v2/first/cat",
        "httpMethod": "POST",
        "extendedRequestId": "P#############A=",
        "requestTime": "10/Aug/2025:09:20:48 +0000",
        "path": "/v2/first/cat",
        "accountId": "account-id",
        "protocol": "HTTP/1.1",
        "stage": "test-invoke-stage",
        "domainPrefix": "testPrefix",
        "requestTimeEpoch": 1###########0,
        "requestId": "b######a-6##4-4##7-b##1-1##########6",
        "identity": {
            "cognitoIdentityPoolId": None,
            "cognitoIdentityId": None,
            "apiKey": "test-invoke-api-key",
            "principalOrgId": None,
            "cognitoAuthenticationType": None,
            "userArn": "arn:aws:sts::############:assumed-role/AWSReservedSSO_AdministratorAccess_9##############d/#######",
            "apiKeyId": "test-invoke-api-key-id",
            "userAgent": "Mozilla/5.0 (Windows NT 10.0; Win64; x64) AppleWebKit/537.36 (KHTML, like Gecko) Chrome/138.0.0.0 Safari/537.36",
            "accountId": "############",
            "caller": "A###################F:#######",
            "sourceIp": "test-invoke-source-ip",
            "accessKey": "A##################Y",
            "cognitoAuthenticationProvider": None,
            "user": "A###################F:#######"
        },
        "domainName": "testPrefix.testDomainName",
        "apiId": "v########7"
    },
    "body": "{""body1"":""bodytest1"",""body2"":""bodytest2""}",
    "isBase64Encoded": False
}
動作確認:外部から
では外部からの接続確認をしてみます。
外部接続する場合のURLはステージの設定画面から取得します。
ステージの名前は、URLの赤い四角で囲まれいるところに使われています。
上記から取得したURLを元に、CURLで試験します。
私はWindows環境で試験したのでPowerShellを使ったわけなんですけど、PowerShellでCURL使うときには、上手く行かないケースが多いです。
以下の公式サイトでは、
公式サイト:チュートリアル: Lambda プロキシ統合を使用して REST API を作成する
以下のように説明があります。
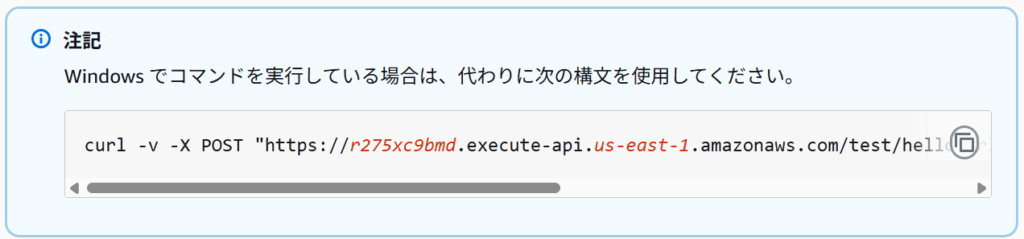
でこれを打って上手く行くかって言うと私は上手く行かなかったです。
調べた感じPower Shellだと「curl」というコマンドにエリアス(別名で実際にはInvoke-WebRequestコマンドが動いているようです)が設定されているので、実際にはcurlが動くわけではないようです。
回避策については、エリアスが効かないようにコマンドを打つことで、「curl.exe」で打てば良いみたいです。
CURLのコマンドは以下になります。
curl.exe -v POST 'https://v########7.execute-api.ap-northeast-1.amazonaws.com/test/v2/first/cat' -H 'content-type: application/json' -d '{ \"greeter\": \"John\" }'何回か失敗して、上記コマンドラインにたどり着きました。
失敗談として書いておきます。
curl.exe -v -X POST "https://v########7.execute-api.ap-northeast-1.amazonaws.com/test/v2/first/cat" -H "content-type: application/json" -d "{ \"greeter\": \"John\" }"上記のように「”」で書いて実行すると一見上手く行くように見えますが、最後に「curl: (3) URL rejected: Bad hostname」と出てて何か良くない感じになります。
最初に記載しているように「’」を使わないとダメなようです。
Note: Unnecessary use of -X or --request, POST is already inferred.
* Host v########7.execute-api.ap-northeast-1.amazonaws.com:443 was resolved.
* IPv6: (none)
* IPv4: 1#.###.##.#9, … 省略…, 3#.##.###.##0
*   Trying 1#.###.##.#9:443...
* schannel: disabled automatic use of client certificate
* ALPN: curl offers http/1.1
* ALPN: server accepted http/1.1
* Connected to v########7.execute-api.ap-northeast-1.amazonaws.com (1#.###.##.#9) port 443
* using HTTP/1.x
> POST /test/v2/first/cat HTTP/1.1
> Host: v########7.execute-api.ap-northeast-1.amazonaws.com
> User-Agent: curl/8.14.1
> Accept: */*
> content-type: application/json
> Content-Length: 13
>
* upload completely sent off: 13 bytes
* schannel: remote party requests renegotiation
* schannel: renegotiating SSL/TLS connection
* schannel: SSL/TLS connection renegotiated
< HTTP/1.1 200 OK
< Date: Sun, 10 Aug 2025 09:42:46 GMT
< Content-Type: */*
< Content-Length: 3
< Connection: keep-alive
< x-amzn-RequestId: e######d-6##f-4##4-b##9-2##########3
< x-amz-apigw-id: P##############=
< X-Amzn-Trace-Id: Root=1-6######5-7######################f;Parent=4##############f;Sampled=0;Lineage=1:7######c:0
<
cat* Connection #0 to host v########7.execute-api.ap-northeast-1.amazonaws.com left intact
Note: Unnecessary use of -X or --request, POST is already inferred.
* URL rejected: Bad hostname
* closing connection #-1
curl: (3) URL rejected: Bad hostname
curl: (3) unmatched close brace/bracket in URL position 1:
と言う訳で、最後に成功したときの結果を張り付けます。
コマンドラインは
curl.exe -v POST 'https://v########7.execute-api.ap-northeast-1.amazonaws.com/test/v2/first/cat' -H 'content-type: application/json' -d '{ \"greeter\": \"John\" }'で結果は
* Could not resolve host: POST
* shutting down connection #0
curl: (6) Could not resolve host: POST
* Host v########7.execute-api.ap-northeast-1.amazonaws.com:443 was resolved.
* IPv6: (none)
* IPv4: 1#.###.##.#9, … 省略…, 3#.##.###.##0
*   Trying 1#.###.###.###:443...
* schannel: disabled automatic use of client certificate
* ALPN: curl offers http/1.1
* ALPN: server accepted http/1.1
* Connected to v########7.execute-api.ap-northeast-1.amazonaws.com (1#.###.###.###) port 443
* using HTTP/1.x
> POST /test/v2/first/cat HTTP/1.1
> Host: v########7.execute-api.ap-northeast-1.amazonaws.com
> User-Agent: curl/8.14.1
> Accept: */*
> content-type: application/json
> Content-Length: 21
>
* upload completely sent off: 21 bytes
* schannel: remote party requests renegotiation
* schannel: renegotiating SSL/TLS connection
* schannel: SSL/TLS connection renegotiated
< HTTP/1.1 200 OK
< Date: Sun, 10 Aug 2025 10:03:46 GMT
< Content-Type: */*
< Content-Length: 3
< Connection: keep-alive
< x-amzn-RequestId: e######d-6##f-4##4-b##9-2##########3
< x-amz-apigw-id: P##############=
< X-Amzn-Trace-Id: Root=1-6######5-7######################f;Parent=4##############f;Sampled=0;Lineage=1:7######c:0
<
cat* Connection #1 to host v########7.execute-api.ap-northeast-1.amazonaws.com left intact
こんな感じで外部からもちゃんとアクセスできました。
最後に今回Private SubnetにLambda関数を配置しています。
で外部からアクセスできるのか?ってのを試してみたくてこういう構成にしました。
一番最初にテストしたときは、実は失敗しました。
原因はLambda関数のセキュリティグループが443を許可してなかったためでした。
失敗すると以下のようなメッセージがcurlの結果ででます。
* schannel: remote party requests renegotiation
* schannel: renegotiating SSL/TLS connection
* schannel: SSL/TLS connection renegotiated
< HTTP/1.1 403 Forbidden
< Date: Sun, 10 Aug 2025 09:32:47 GMT
< Content-Type: application/json
< Content-Length: 23
< Connection: keep-alive
< x-amzn-RequestId: ########-####-####-####-############
< x-amzn-ErrorType: ForbiddenException
< x-amz-apigw-id: P##############=
<
{"message":"Forbidden"}* Connection #0 to host v########7.execute-api.ap-northeast-1.amazonaws.com left intact
同じようなレスポンスを受けたときは、セキュリティグループを確認してください。
特にサブネット指定しないときは、セキュリティグループの指定は必要ないです。
この場合は、AWS側で用意されているどこかの環境でLambda関数が動くんでしょうけど、CDKで作るときは、Lambda関数のvpc_configパラメータの指定も不要になります。
大体こんなところでしょうか~
今回のソースは、GITから取得してください~
では次回「いちはじCDK第10回 Route53-ドメイン登録」で、もう少しAPI Gatewayの機能を追加準備になります~。
コメント